


Course Tour
-
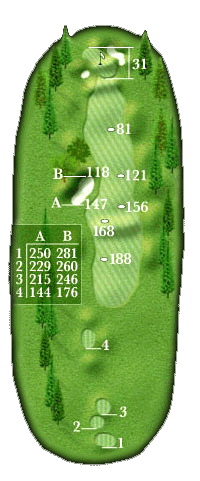
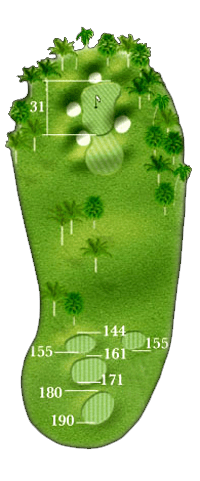
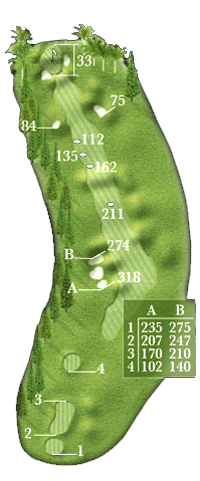
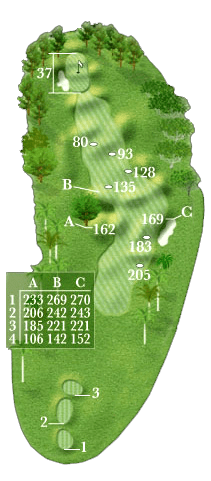
Hole 1 - Par 4
Yardage
Championship: 399 | Regular: 378 | Ladies: 295
As you stand on the tee box, try not to be distracted of the great Diamond Head view, you want to hit your driver down the right side of the fairway. From this point it gives you a great angle to the green, but watch out you don’t want to go left or long.
-
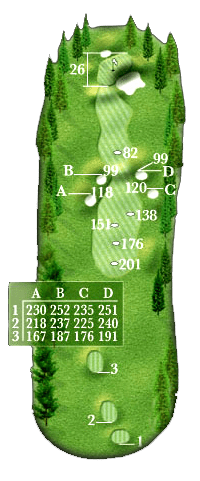
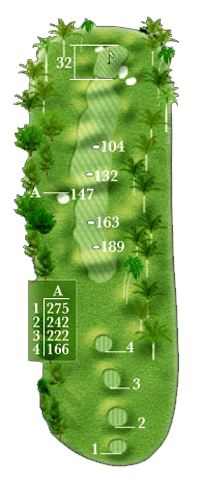
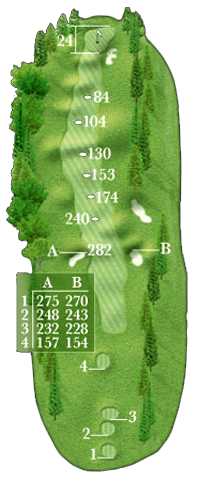
Hole 2 - Par 4
Yardage
Championship: 346 | Regular: 332 | Ladies: 283
From the tee box you would like to hit your drive short of the bunkers that narrow the fairway. Don’t go too far right off the tee or you could lose your line of sight to the green. The key to this hole is hitting the green, because there is no easy chip from long and left and this can be disastrous.
-
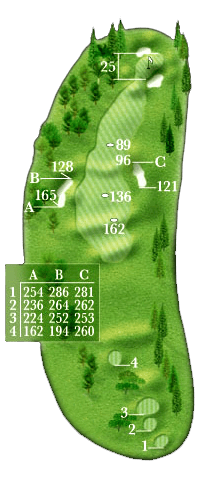
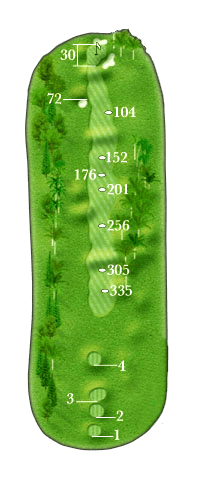
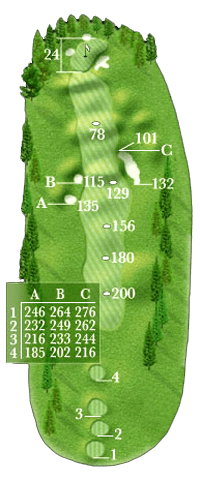
Hole 3 - Par 4
Yardage
Championship: 367 | Regular: 353 | Ladies: 297
Hit your drive down the left center of the fairway, this leaves you with a great angle to the green. If you hit your drive far, watch out the fairways slopes from right to left pushing the ball in unfavorable lies. Your approach shot should be played to the center of the green. Going long is not the miss you want.
-
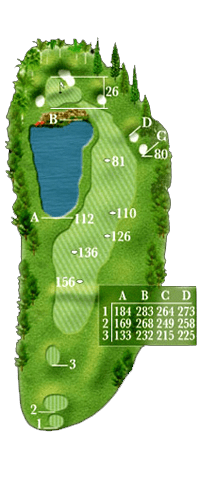
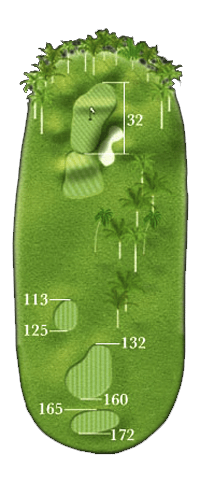
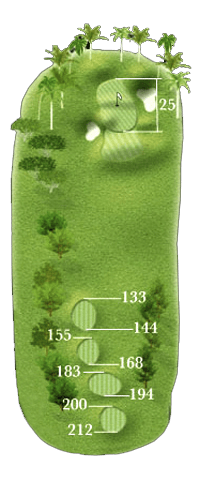
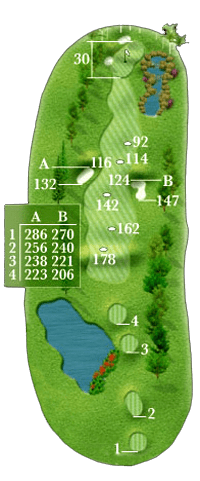
Hole 4 - Par 4
Yardage
Championship: 300 | Regular: 284 | Ladies: 249
This is one of Waikele Country Club’s signature holes, but don’t let the beauty of the hole distract you. The best position off the tee is just short of the pot bunkers. From this position, the water hazard is taken out of play. Your approach shot should be played with a short iron. Try to leave your shot below the hole, because the green slopes from back to front. Going long on this hole is a bad idea.
-
Hole 5 - Par 3
Yardage
Championship: 184 | Regular: 162 | Ladies: 145
Standing on the tee box, you don’t feel the wind, so it is important to look at the flag and the trees around the green. The wind will normally push the ball from left to right on this hole. Pay attention to the elevation, over clubbing is common on this hole.
-
Hole 6 - Par 4
Yardage
Championship: 409 | Regular: 377 | Ladies: 299
While standing on the tee box, you want to hit your drive towards the left center of the fairway. This will leave you a great entry shot into the green. The key to this hole is to avoid the right side at all costs.
-
Hole 7 - Par 5
Yardage
Championship: 546 | Regular: 514 | Ladies: 443
Favor the right center of the fairway on the drive and the second shot, because the fairway slopes severely to the left pushing your ball towards out-of-bounds. Long hitters can try to hit the green in two shots, but there is no room to go left on this hole. A third shot, will leave you with a short iron, but take in account the elevation of the green. The best play is a high soft shot.
-
Hole 8 - Par 3
Yardage
Championship: 167 | Regular: 152 | Ladies: 118
Standing on the tee box, the wind comes at you from the right. Club selection is the key to this hole. Remember to think of the wind and green elevation. On the green it is best to be below the hole, but if your not and putting towards the front of the green, this put is faster than you think. Shots hit over the green are most difficult to recover from.
-
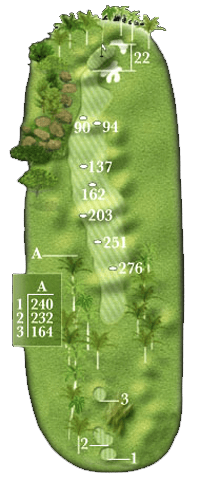
Hole 9 - Par 5
Yardage
Championship: 599 | Regular: 527 | Ladies: 443
Play your drive straight down the middle of the fairway avoiding the bunkers on the left. Your second shot should be short of the two fairway bunkers that narrow your approach. For your third shot a short iron is best, remember it is also important to be below the hole on this green. Going long isn’t an option because the out-of-bounds is right over the hill.
-

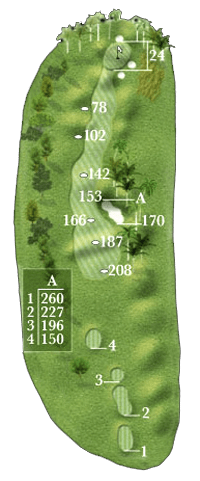
Hole 10 - Par 4
Yardage
Championship: 322 | Regular: 302 | Ladies: 264
From the tee box, hit your drive to the 100 yard marker and this will leave you with a short approach shot. For those long hitters, don’t get fooled by trying to drive the green. It is reachable, however, there is out-of-bounds on the left and right side, and if you don’t reach it, you will be left with a very difficult pitch shot. The risk is not worth the reward on this hole.
-
Hole 11 - Par 3
Yardage
Championship: 209 | Regular: 191 | Ladies: 142
This tee shot is pretty simple for strategy. Go at the green, but if you fall short, you want to keep the green in front of you. Tee shots that are left and right of the green will have very difficult pitch shots to get on the green. Keep in mind the wind and tee box elevation.
-
Hole 12 - Par 5
Yardage
Championship: 507 | Regular: 497 | Ladies: 432
This is the easiest of the par 5’s, and is reachable for long hitters. For those that can reach the green in two, you want to hit your shot towards the left center of the fairway. This will leave you with an opening to the green. Those that can’t reach the green in two, should play to the center of the fairway and hit their second shot to the left side of the fairway. This will leave you with a short iron to attack the flag. Beware of going long or left of the green to avoid penalties.
-
Hole 13 - Par 4
Yardage
Championship: 418 | Regular: 383 | Ladies: 307
This hole has a slight bend to it, so you want to hit your drive along the left side of the fairway. This will leave you with a good angle to attack the hole. Your second shot does require directional control, due to the trouble surrounding the green. Don’t go long here.
-
Hole 14 - Par 4
Yardage
Championship: 409 | Regular: 380 | Ladies: 282
This is one of the more difficult holes on the course. As you stand on the tee box, aim your drive to the right of mound in the fairway. If you go over this mound you will find yourself in a very deep crater that will make your second shot a challenge. Your approach shot need to be high and soft, because this is a very narrow green with trouble on both side of it. The green slopes from back to front, so it is a must that you keep your ball below the hole. If you go long with the pin on the front part of the green. You will bring 3 and 4 putts into play.
-
Hole 15 - Par 5
Yardage
Championship: 550 | Regular: 523 | Ladies: 434
The hardest of the par 5’s. This hole plays an extra 50 yards if the tradewinds are blowing. Hit your tee shot towards the right side of the bunker that is on the left. This will give you a better angle for your second shot. Your third shot should be a short iron in. This green is very large so it requires accurate club selection.
-
Hole 16 - Par 4
Yardage
Championship: 378 | Regular: 363 | Ladies: 320
An accurate tee shot is required here. Hit your ball short of the fairway bunkers on both sides. For the long hitters, hit your tee shot just right of the left fairway bunkers and carry the hill, which will leave you a short pitch shot to the green. Remember that the wind is usually helping you on this hole, so you might want to club down, when hitting your approach shot.
-

Hole 17 - Par 3
Yardage
Championship: 201 | Regular: 181 | Ladies: 147
Another one of Waikele’s premiere holes. First determine the wind and tee elevation is selecting your club. The green is long and narrow, so accuracy is important. However, it is much better if you miss on the right side, because it usually comes back towards the green. The left side is all water and this can cause you to have a big number.
-
Hole 18 - Par 4
Yardage
Championship: 392 | Regular: 362 | Ladies: 326
This is a difficult driving hole. Play off the left fairway bunker, this will give you a better angle to the two tiered green. Your approach shot needs to be the correct yardage, because there is danger long and right. Avoiding the whole right side on this hole is recommended. Beware of the water that is just off the right side of the green.